Introduction
What Exactly is pfSense?
The multifunctional pfSense software router/firewall developed by Netgate, based on the FreeBSD operating system.
pfSense is available in several versions: the software-based Community Edition (CE) and as a NetGate hardware appliance. Commercial support for the Community Edition ranges from $400 to $800 annually. In 2021, pfSense Plus Software was launched, which is now the focus for developing new features.
pfSense features a modular architecture and comes with its own package manager. Key features include routing (dynamic included), firewall capabilities, NAT, DHCP server, load balancing, VPN (including OpenVPN and L2TP), dDNS, PPPoE, IDS, proxy, and more. Support for building fault-tolerant clusters is provided. It includes built-in monitoring, logging, and reporting capabilities.
Many organizations and home offices use pfSense for their Internet connectivity needs. The free Community Edition, which lacks technical support, is frequently utilized.
Since its inception in 2004, the product has become mature and stable. This maturity often allows using the free Community Edition without technical support.
What Are The Popular Uses for pfSense
pfSense software is widely used as a versatile router and firewall solution. It functions as a router for both LAN and WAN environments, bridging local devices and external networks for seamless communication.
Wi-Fi Hotspot and Captive Portal: With pfSense, you can set up customizable Wi-Fi hotspots or captive portals, isolating guest networks and managing public IPs for NAT.
VPN Router: pfSense provides robust VPN support for secure, private connections without disrupting existing firewall configurations.
Firewall and Traffic Management: As a perimeter firewall, pfSense handles complex setups, securing LANs, WANs, and DMZs while managing traffic efficiently.
DHCP/DNS Server: Acting as a DHCP and DNS server, pfSense simplifies IP management and enhances network traffic control with compatibility for IPv4 and IPv6.
Transparent Squid Proxy: Integrated with Squid Proxy, pfSense enhances network efficiency through caching, proxy capabilities, and granular access control.
Multi-WAN Router and Load Balancer: pfSense supports multiple WANs for load balancing and failover, ensuring reliable connectivity with reduced latency.
Port Forwarding and NAT: pfSense manages port forwarding and NAT, securely connecting internal and external networks while minimizing public IP requirements.
pfSense Software Default Configuration
After installation and interface assignment, pfSense software applies the following default settings:
- WAN works as an IPv4 and IPv6 DHCP client, requesting a prefix delegation if available.
- LAN has a static IPv4 address of 192.168.1.1/24 and uses a delegated IPv6 prefix from WAN if one is available (Track IPv6).
- The firewall blocks all incoming connections to WAN and allows all outgoing connections from LAN.
- NAT is enabled for IPv4 traffic from LAN to WAN.
- DHCP servers are active: IPv4 DHCP for LAN, and IPv6 DHCPv6 with SLAAC if WAN gets a prefix delegation.
- The DNS Resolver is enabled to handle DNS queries.
- SSH is turned off.
- WebGUI runs on HTTPS at port 443.
- Default login credentials are set as described in the documentation.
This default software configuration ensures a secure starting point while maintaining basic functionality for both IPv4 and IPv6 networks.
Hardware Requirements
The Community Edition can be installed on both bare metal and virtual machines. Hardware requirements vary with network interface speeds –ranging from a minimum of 500 MHz/512 MiB for 10 Mbps to a multi-core 2+ GHz/2 GiB for 1 Gbps.
Utilizing additional features and modules requires more CPU cores and more RAM. For commonly used connections at 100 Mbps, 1 GHz/1 GB is recommended. For higher speeds, a PCIe bus is also necessary to avoid bottlenecks.
Disk size requirements are minimal but depend on the functionalities used; the minimum size is 8 GB. Moreover, since pfSense is based on FreeBSD, the compatible hardware list is determined by what FreeBSD supports.
Installing pfSense CE
We will show how to install, configure, and operate pfSense using a virtual machine in the Servercore cloud. For our setup, we will create a lab with two machines: one running pfSense with both external and internal interfaces, and another serving as a desktop client with an internal interface.
pfSense is a custom solution deployed on the Servercore cloud platform, presenting several unique challenges.
As of the year 2021:
- In the installation image settings, specify “Linux” instead of “Other” to avoid the “Internal error Invalid image metadata. Error: Field value other is invalid”).
- The distribution only works with network disks and cannot be installed on servers that use local disks.
- It’s also impossible to combine installation via an image in the control panel with selecting two network interfaces at the same time.
Workarounds include creating a machine with two interfaces and connecting the installation ISO via OpenStack CLI, or installing with one network interface and later adding a second one. The latter method is simpler and will be what we use.
Loading the Image
On the pfSense CE download page, select the AMD64 (64-bit) architecture and the DVD Image (ISO) type.

Verify the integrity of the downloaded archive and then unpack it:
$ sha256sum=($(sha256sum Download/pfSense-CE-2.5.2-RELEASE-amd64.iso.gz)) && [ “$sha256sum” == “0266a16aa070cbea073fd4189a5a376d89c2d3e1dacc172c31f7e4e75b1db6bd” ] && echo “Ok” || echo “Something wrong”
$ gunzip Download/pfSense-CE-2.5.2-RELEASE-amd64.iso.gz
View the sha256 checksum value 0266a16aa070cbea073fd4189a5a376d89c2d3e1dacc172c31f7e4e75b1db6bd on the download page. This example applies to the current version 2.5.2 at the time of writing.
Next, create and upload the image to the storage repository via the control panel, selecting Linux OS:
Installation and Initial Set Up of pfSense
In the Cloud Platform servers section, click the “Create Server” button at the top right (or center if it’s the first one). Select some bottom-tier configuration (1 vCPU/512 MiB RAM/5 GiB Storage) – enough for testing purposes; system requirements for other scenarios are detailed above.
At this stage, set the network as “New Private Network” – it will be internal with the address 192.168.1.0/24. Assign the name int_net and disable DHCP. The gateway setting does not impact anything in this case, but it cannot be removed.
After entering the necessary parameters, click the “Create” button. The server will be configured and available within 30 seconds. If you accidentally closed the tab where the pfsense virtual machine was being created – no worries, the server can be accessed in the global “Servers” section. To interact with the server console, navigate to its card under the “Servers” tab and open the “Console” item.
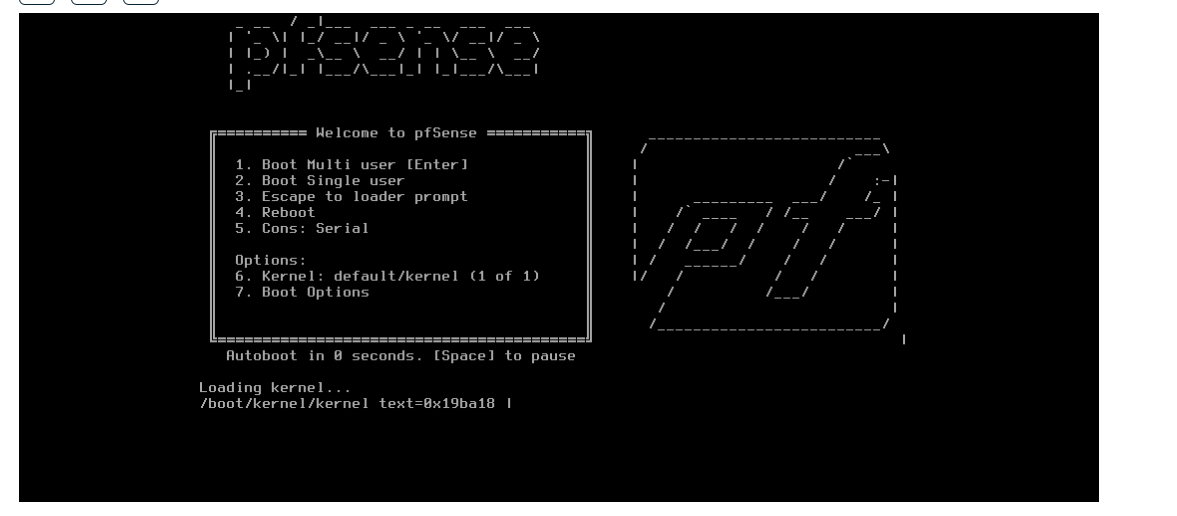
Immediately after the creation, the server starts, we see this window, at this stage just waiting for loading.
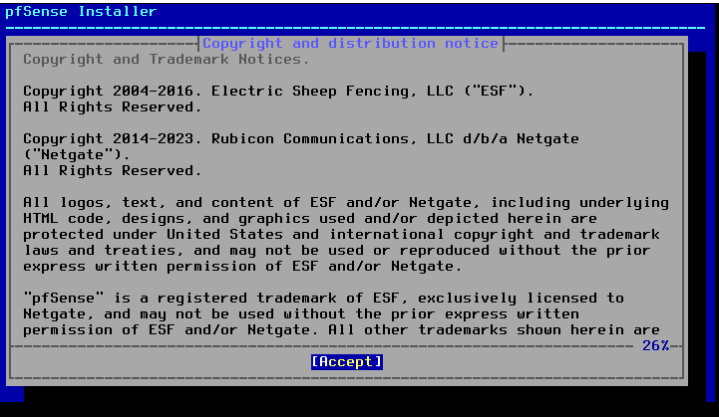
During installation, use the arrow keys to navigate through the menus. Firstly, read and accept the copyright terms.
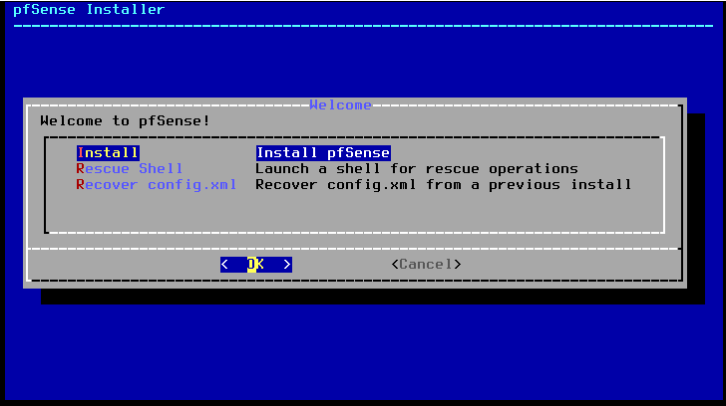
Select the installation mode. At this stage, you can also activate the built-in recovery mode.
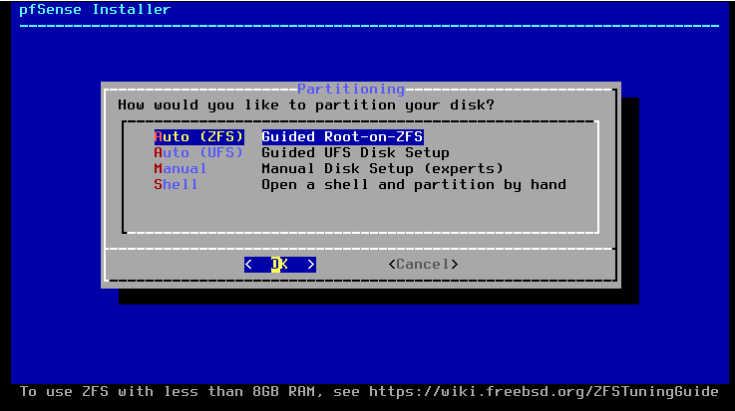
Depending on the hardware architecture, choose the boot and partitioning method; for VMs, select BIOS. ZFS/UFS installer menu has changed, additional features like RAID array have appeared. ZFS is recommended by default. USF will be recommended if you have less than 8GB RAM.
Next, you will have options to choose hostname, which identifies the system within your network, and encryption details.
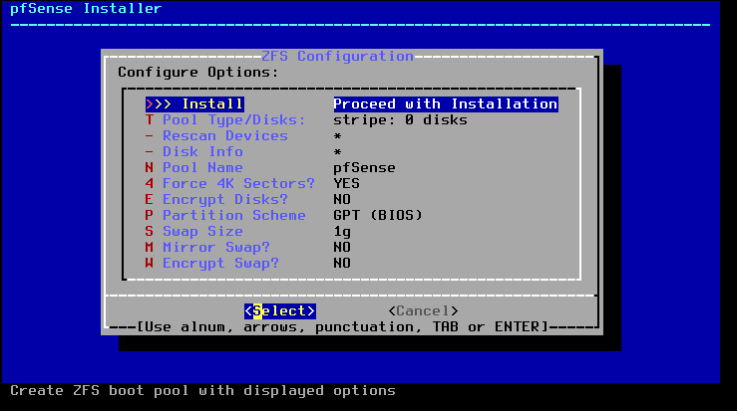
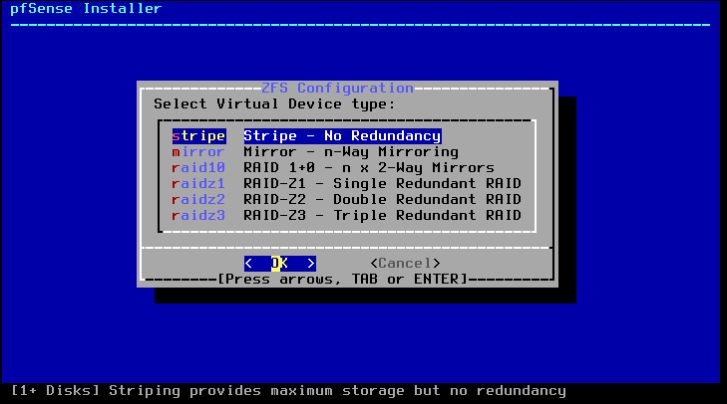
We need to choose a type of storage, RAID. If we have a cloud, we don’t need a RAID here.
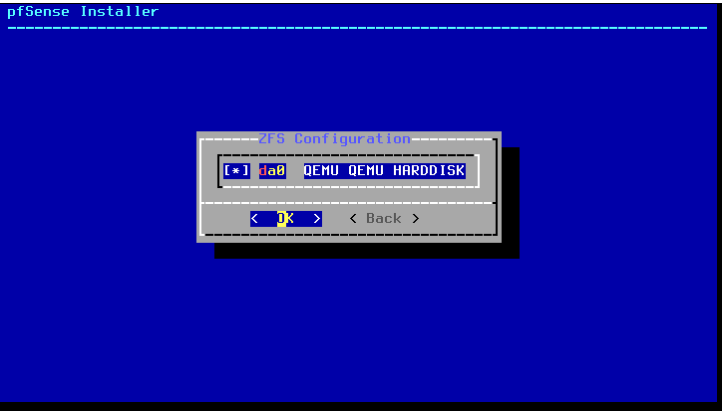
Selecting the disks.
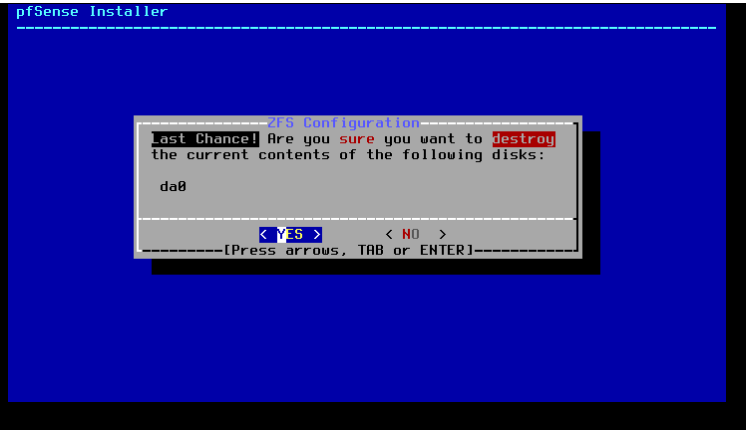
Agree that the disk will be formatted and everything will be deleted from it.
The installation process is running and the hash sum of the image is currently being verified.

Upon completion of installation, the following window will appear.
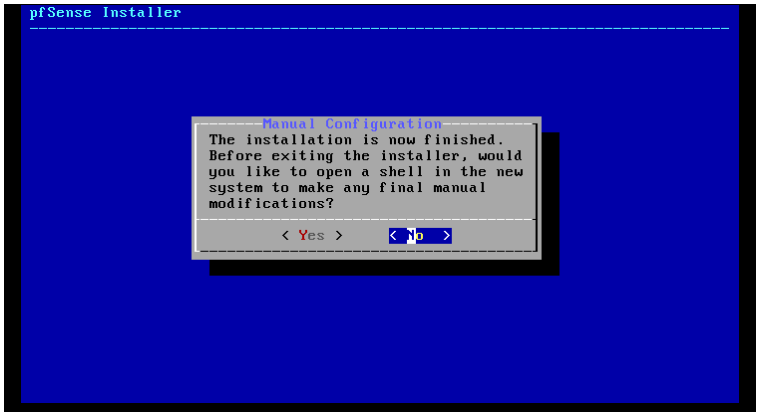
By clicking “Yes“, you will be taken to the Shell. Here, you can manually adjust any system settings. Once the setup is complete, return to the installation program by executing the “exit” command. Normally, no changes are needed at this stage; simply click “No“.
Configuration Restore
During the configuration selection process in pfSense installation, users encounter options for restoring previous configurations. Once initiated, an online installer scans for available configuration files, searching both previous pfSense installations and FAT/FAT32 partitions on USB drives. If configurations are found, they are presented in a list for selection.
Choosing a configuration is straightforward: navigate using the arrow keys and confirm your choice with Enter. Opting to restore settings ensures that essential data, like SSH host keys and DHCP leases, is automatically copied to the new installation, maintaining continuity. The selected configuration is then displayed on the welcome screen as a final confirmation.
If a fresh installation is preferred instead, the Configuration Restore menu allows you to reset the selection and proceed with the default settings. This approach offers flexibility, enabling users to tailor the installation process to their specific needs.
Network Setup
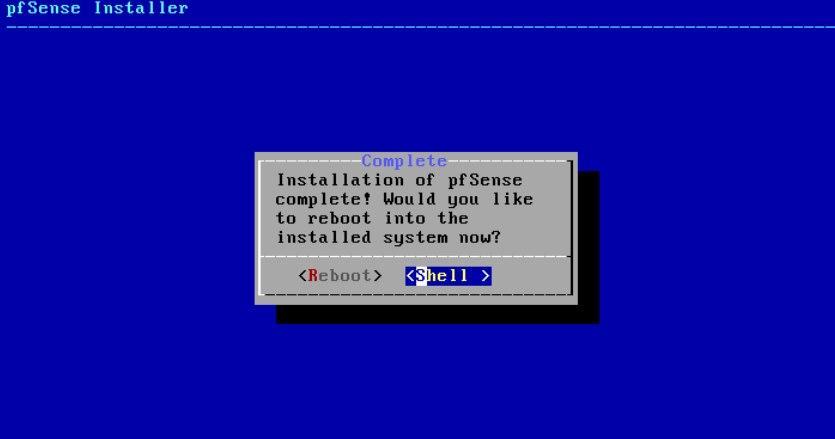
For our lab, we will need one external and one internal network – add a second interface for this purpose. Launch the shell by clicking “Shell“.
Then issue the shutdown command:
# poweroff
In real life, this step would not be necessary when installing on your own server.
In the global “Servers” tab, pfSense virtual machine will feature a SHUTOFF status.
Next, we’ll explore a scenario of connecting to an ISP by IP, where we are assigned a network with a /29 mask (the smallest available on the Servercore cloud platform).
Navigate to the global “Network” -> “Public Subnets” panel and click “Create Subnet“.
In the control panel, you can choose among masks ranging from /29 to /27. If your ISP has provided a network with a /30 mask, your connection and setup process will be similar.
At this stage, the system will allocate a network (in this example, 95.181.178.255/29) and set a default gateway (95.181.178.255). This will be necessary for configuring the WAN interface later on. In a real-world scenario, this would be your ISP’s gateway address.
Add a new network to our server by navigating to “Servers” -> “Ports” -> “Add Port” -> “Select Network” -> “Add Port“.
The system has assigned an address (94.26.250.178) to our server. It now has two interfaces as a true internet gateway should – an external one included in the global network and an internal one in our local network.
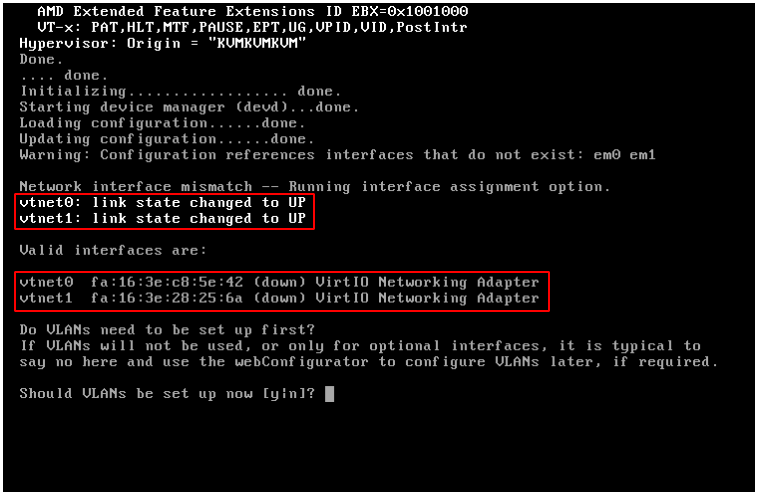
The Servercore Cloud Platform does not support VLAN; we do not use it and proceed to configure interfaces.
With interface vtnet0, our server faces inward towards the network, while vtnet1 faces outward.
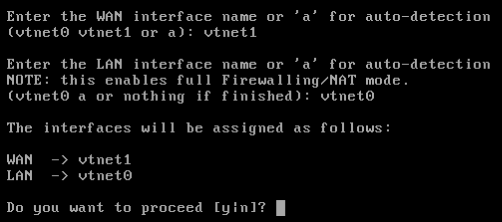
Press “y” to apply settings and continue with installation.
In the pfSense console, assign the previously issued external address to the WAN interface.
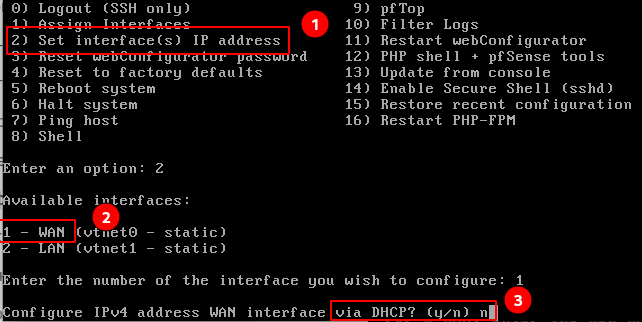
Item 2-Set Iface IP -> 1-WAN -> DHCP -> N -> Enter IP-Address -> Enter mask -> Enter gateway.
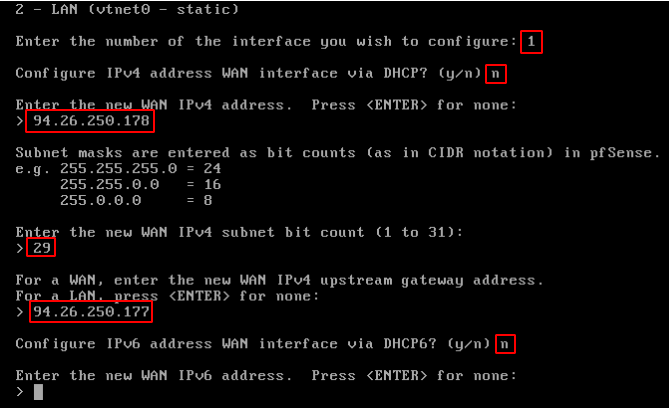
Item 2-Set Iface IP -> 1-WAN -> DHCP -> N -> Enter IP-Address -> Enter mask -> Enter gateway.
Next, you will be prompted to modify IPv6 settings. In our scenario, no changes are needed to IPv6 settings.
Confirm by answering “Yes” to “Do you want to revert to HTTP as the webConfigurator protocol?” and wait 3-4 seconds for the configuration to apply.
Verify that the ISP gateway is accessible (this option is available in step 7).
After selecting “Ping host“, enter either the ISP’s gateway address or, in our lab scenario, that of the platform.
Test Client
Next, we’ll add a test machine (Ubuntu 18/1 vCPU/2 GB RAM/8 GB Storage) to our lab. This machine will simulate our user and connect to the Internet via pfSense. We’ll also use this pfsense VM to continue configuration.
All that’s needed from this machine is a browser. Take a ready-made Ubuntu 18 image and add a graphical interface to it. To access repositories, temporarily connect the machine directly to an external network.
Click “Create“, wait 15-20 seconds for the server to initialize, then connect to its console.
If an internal network (int_net) was used during pfsense VM machine creation, either recreate the machine entirely or replace that network interface with an external one before proceeding with operations on the machine.
# ip link set eth0 down
# ip addr add 95.181.178.255/29 dev eth0
# ip link set eth0 up
# ip route add default via 95.181.178.255 dev eth0
# ping 95.181.178.255
# ping ya.ru
OS Update
Even though it’s just a test machine, start by updating it:
# apt-get update -y && apt-get upgrade -y
If the kernel has been updated, the machine should be rebooted.
GUI Installation
Graphics customization is beyond the scope of this article, more details can be found on thematic sites, the list of commands may be as follows.
# apt install tasksel slim -y
# tasksel install ubuntu-desktop
# adduser myuser
# systemctl start slim
On the graphical part: on Servercore platform you can use Alt+Left/Right Arrow or F1 combination to switch between VM consoles, the usual Ctrl+Alt+Fn may not work.
This is also where a regular user is created to prevent further work with root access rights.
Switching the Network Interface
After launching the GUI, we move our desktop to the internal network, for which we remove the external interface on the “Ports” tab of the server and connect the internal network – int_net (it is better to do it on a switched-off machine – systemctl poweroff).
Since the image is taken from the Servercore repository, it is customized to interact with that platform and gets its network configuration from it.
In our lab this is not needed, our DHCP runs on pfSense and it is up to it to set the client’s network parameters. The behavior of the guest machine is changed by a command.
$ sudo touch /etc/cloud/cloud-init.disabled
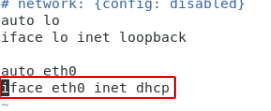
Netplan should not be used in the cloud platform, so we’ll edit the file to enable DHCP on the pfsense virtual machine interface.
/etc/network/interfaces.d/50-cloud-init.cfg
Change it as follows:
Check:
You can view the current IP address with the “ip a[address]” command, and check the settings received from the DHCP server with the command.
less /var/lib/dhcp/dhclient.<iface>.leases
You can find out the address of the DHCP server like this:

If for some reason DHCP was enabled on the int_net network when the machine was created, DHCP on this network must be turned off before shutting down or rebooting the machine. Otherwise, the host 192.168.1.2 or .3 will distribute addresses. After that, configure the cloud-init and network interface settings as above.
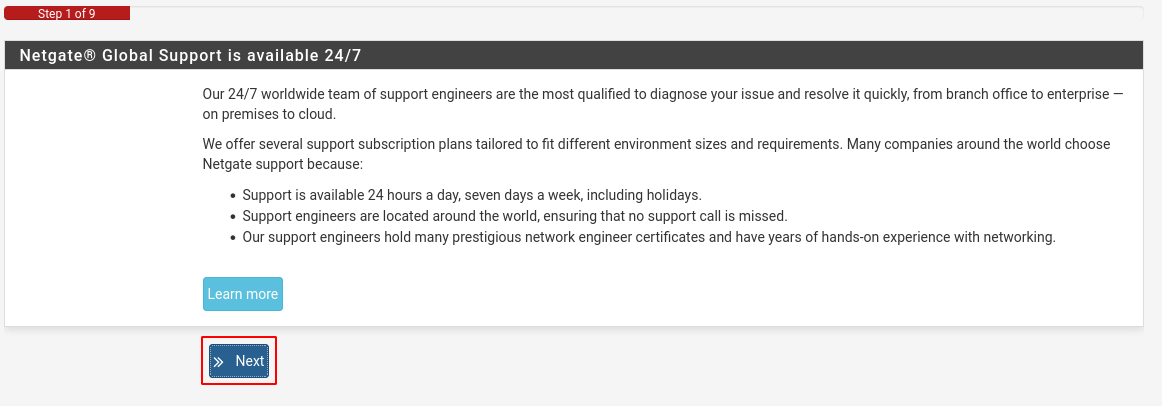
9 Steps of the pfSense Setup Wizard
Launch the browser, go to 192.168.1.1 – we find ourselves in the web interface of pfSense. Enter the default name/password (admin/pfsense), and a 9-step configuration wizard will start. Only a small number of settings need to be changed during basic setup.
The banner at the top reminds you to change the default password to your own. At step 6, the setup wizard will prompt you to change your password, so you can ignore the banner for now.
You will see the welcome message of the Setup Wizard.
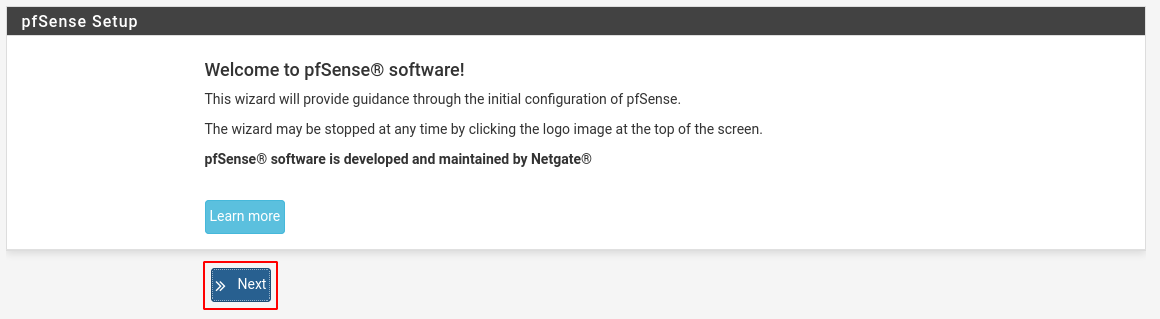
Step 1. Start setting up
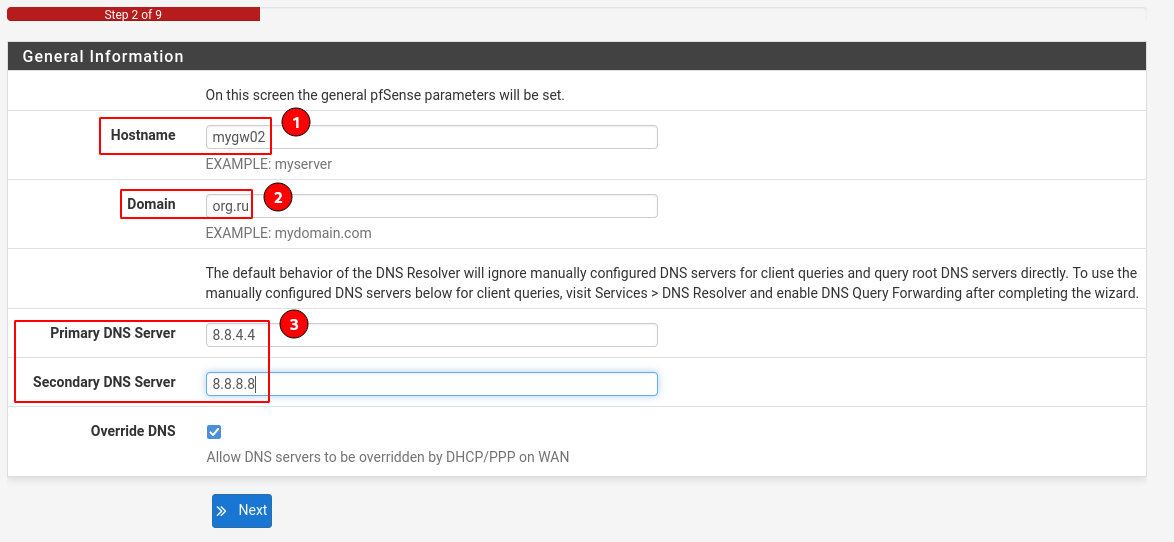
Step 2. Specify the gateway name and domain
In the wizard we specify the name and domain of our gateway (step 2, e.g., mygw02 & myorg.ru), DNS servers (e.g., dns.google – 8.8.4.4 & 8.8.8.8).
Step 3. Setting up time synchronization
How to set up time synchronization via NTP and select your time zone? You can either keep the default server or choose one according to your preferences with an appropriate stratum (level 3 is sufficient).
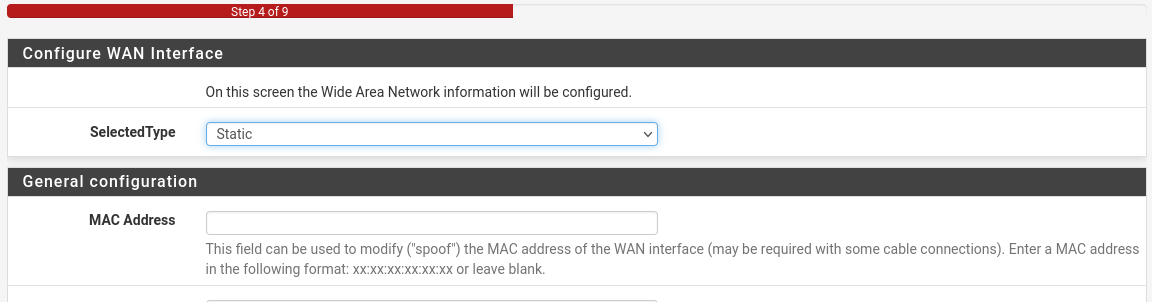
Step 4. Setting up PPPoE
There’s usually no need to make any changes at this step. Specify the upstream gateway if it hasn’t been set earlier in addition to the external address. Here, configure the PPPoE settings if your ISP requires them. Some providers require a connection from a specific MAC address, which can also be specified at this step.
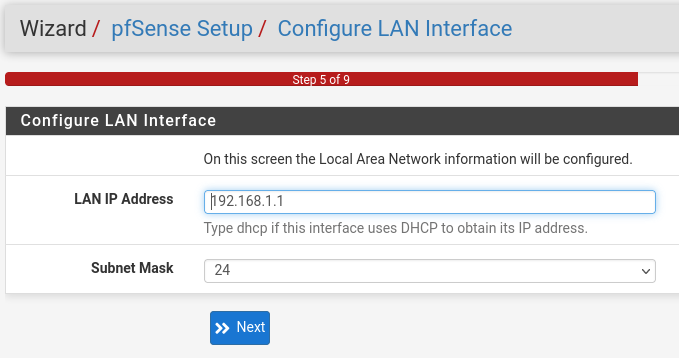
Step 5. Configuring the internal interface
This concerns configuring the internal interface. It’s already configured on our end, so let’s proceed to the next step.
Step 6. Admin password
At this step, you will be prompted to change the administrator password:
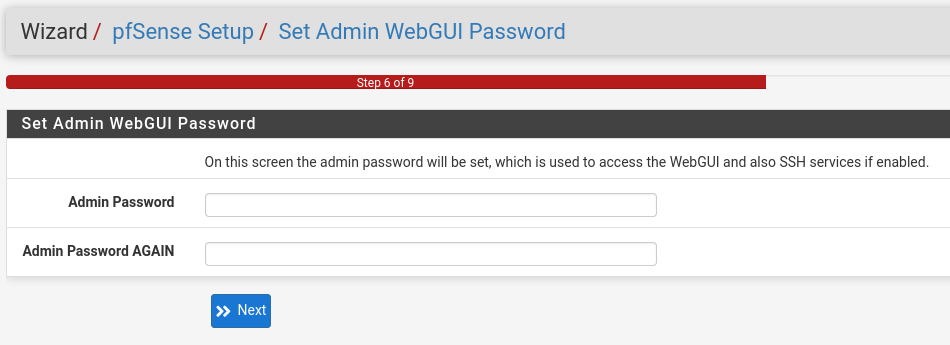
No verification is done to check if it matches the previous password, including the default one. You can technically reuse an old password, but for security reasons, it’s advisable to set a strong one.
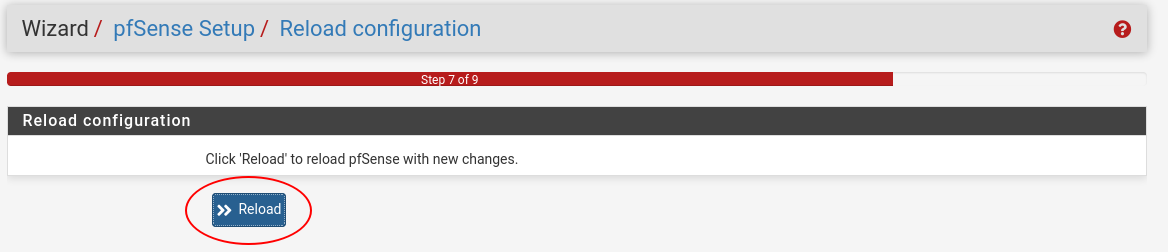
Step 7. Applying settings
You will then be prompted to apply the settings.
Step 8. Continuing to apply of settings

Step 9. Setup complete
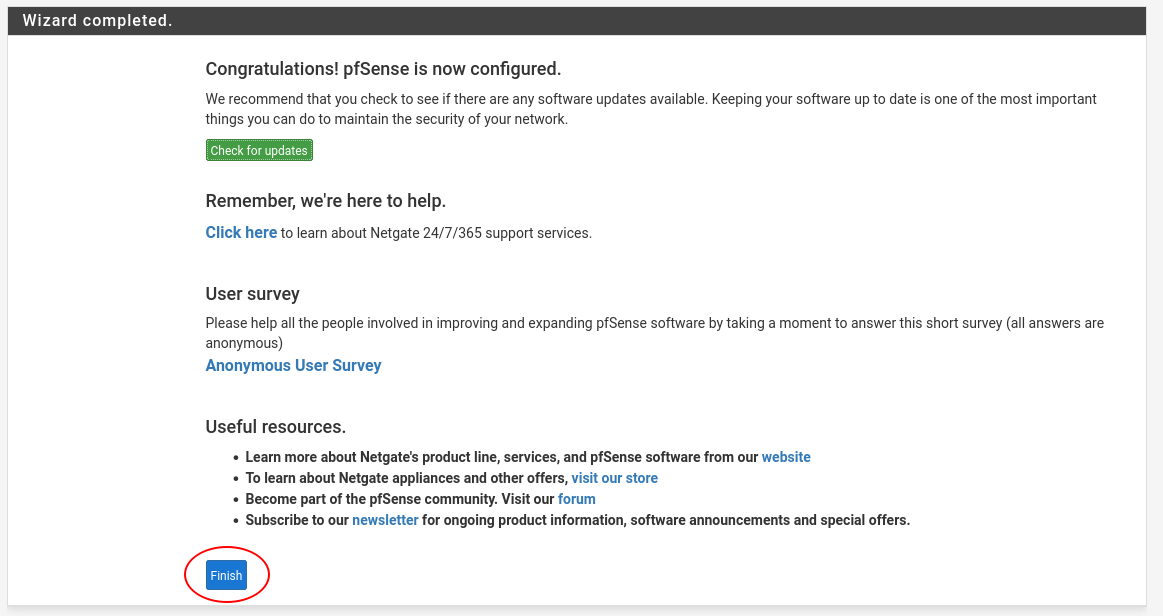
Click “Finish” – the setup wizard has successfully completed its task. At this stage, pfSense is ready to function as a basic Internet gateway – you can now use a browser to access a search engine and run a network speed test.

In the future (for example, after resetting to factory settings: Diagnostics -> Factory Defaults), you can restart the wizard from the System -> Setup Wizard menu.
pfSense Interface
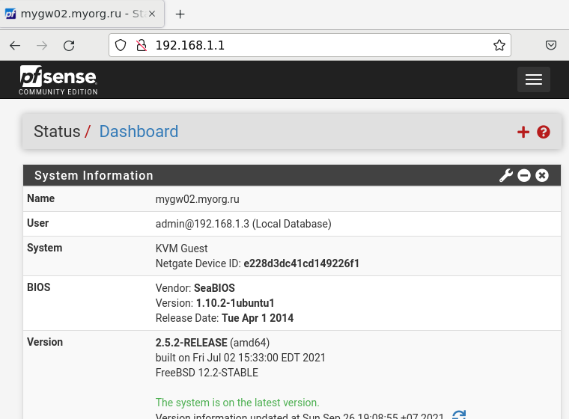
Upon connecting to the router, the first thing displayed is the dashboard, which may appear as follows:
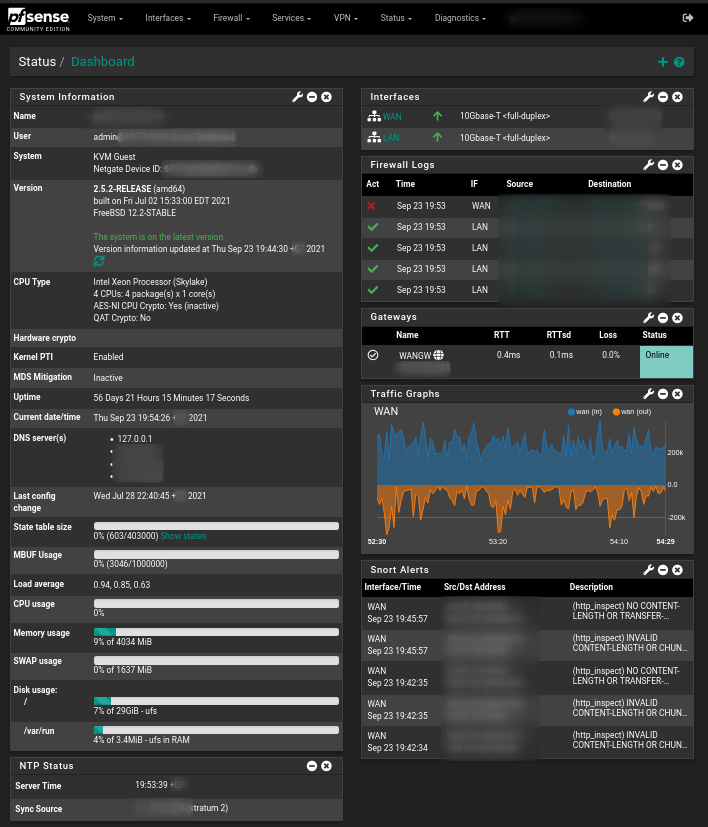
The dashboard may take some time to render.
The dashboard is highly customizable – you can add new elements, remove unused ones, and adjust existing ones.
Menu structure
pfSense offers numerous functions, with settings organized into groups:
- The pfSense logo button takes you back to the dashboard.
- System – general system settings, including routing management, certificates, updates, and a package manager.
- Interfaces – mapping and setting up interfaces.
- Firewall – configuring NAT and pfSense firewall rules, traffic shaping is also configured here.
- Services – additional functions run by separate daemons (DHCP Server/Relay, DNS; NTP, SNMP, etc.), including those installed from the package manager (Squid, Snort, Nagios (NRPE), and Zabbix agents).
- VPN – settings for remote access services (IPsec, L2TP, OpenVPN) are found here.
- Status – displays current component status including counters, real-time values, monitoring graphs, and system logs.
- Diagnostics – various diagnostic tools available (backup/restore, shutdown/restart, ping/traceroute/DNS lookup, and more).
- Mygw02.myorg.ru acts like a help/about button.
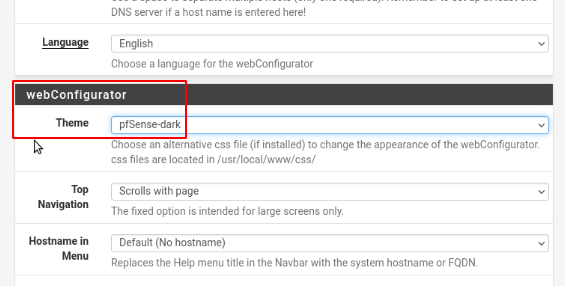
Theme change
Many prefer “dark” themes available in pfSense under System -> General Setup in the webConfigurator section:
The article will alternate between using the default dark and light themes.
Localization
The System -> General Setup section’s Localization section allows you to switch the web interface’s language via the Language parameter.
Diagnostics
Initial diagnostics typically start with analyzing system and component logs, followed by assessing historical system load over a specific period, such as the last day or hour.
System Logs
Accessible via the Status -> System Logs tab. There are numerous logs, but they are organized by category. Logs under Status/System Logs/System/General and Status/System Logs/Firewall will be of primary interest.
Load Charts
Assessing system load is conveniently done graphically in the Status/Monitoring section.
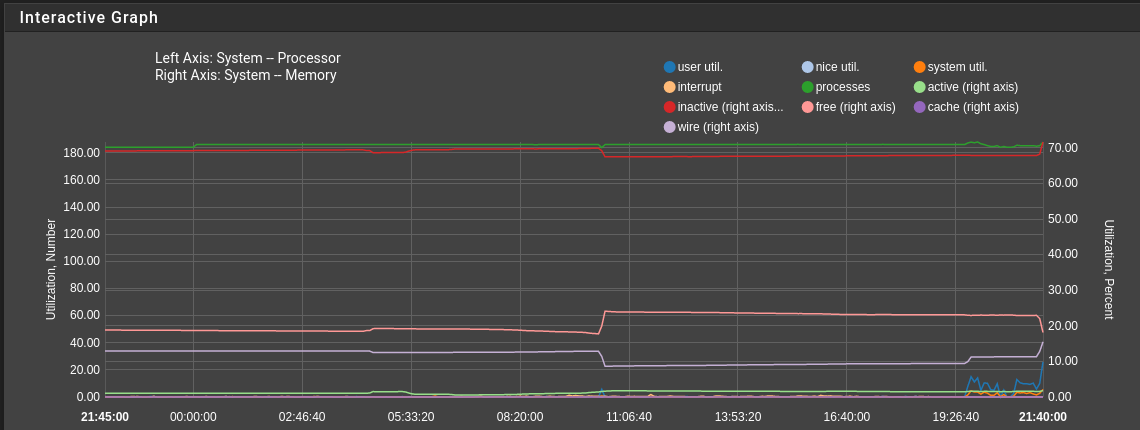
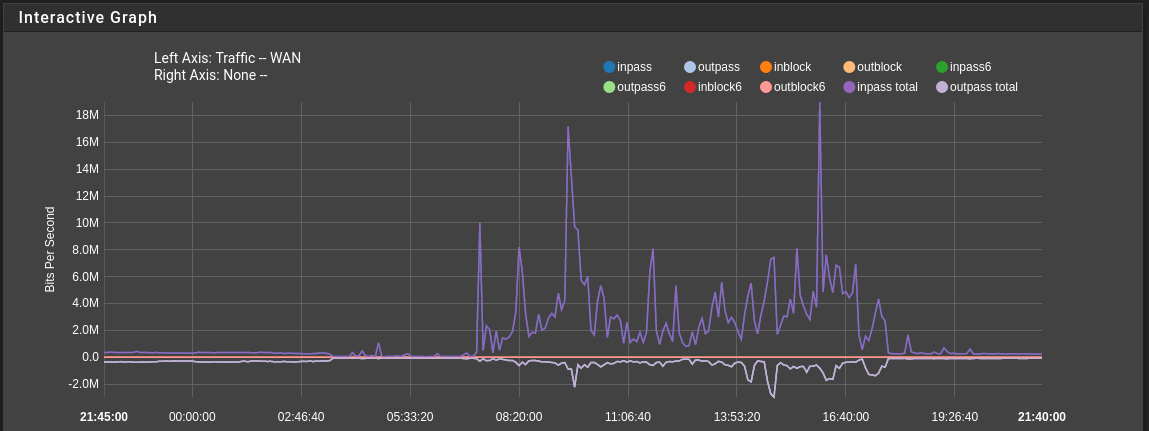
Further diagnostics involve careful analysis of counter values on the “Statuses” tab and using diagnostic tools on the “Diagnostics” tab.
Password Reset
If you lose your pfSense password, it can be reset to default via console option 3 (Reset webConfigurator password).
WAN Interface: select and configure
WAN interfaces can be configured for DHCP, static IP, or PPPoE connectivity. Additionally, VLAN tagging is available if required.
To adjust the interface type, select Interface Mode and press Enter. For VLAN tagging, choose VLAN Settings. The option to toggle the local resolver is available under Use Local Resolver. Each of these settings is explained in more detail in the following sections. The configuration options change based on the selected Interface Mode, as different connection types require unique settings.
When configured for DHCP, the process is automatic, with no additional fields to set up.
Switching to Static IP Address requires specifying:
- IP Address: Enter the IPv4 address and CIDR mask.
- Mask for the LAN: To configure the LAN, set a static IP address and define a subnet mask. If no mask is specified, a default of /24 is assumed.
- Default Gateway: Provide the IPv4 address of the gateway for Internet access.
- DNS Server: Specify an IPv4 address for DNS resolution (e.g., ISP-provided or public services like Google DNS or Cloudflare).
Once these fields are populated, the static configuration is complete, as shown in the accompanying example image.
For PPPoE, several additional fields must be configured:
- PPPoE User: The username for authentication with the PPPoE provider. It is always better to change default username and password.
- PPPoE Password: The associated password.
- PPPoE Service Name: Required by some providers for authentication. If not needed, this field can remain empty.
- PPPoE Null Service Name: This toggles whether a null or empty service name is sent during authentication. Enabling this option clears any entered service name automatically.
Once these details are entered, the address and PPPoE configuration is finalized and ready for use.
By following these steps, the WAN interface can be tailored to the specific connectivity needs of the installation.
Advanced Settings
pfSense Firewall Rules
Default settings prevent connections to pfSense from external networks and allow client access outward using NAT translation (specifically dynamic NAT or NAPT as per RFC 2663, also known as NAT overload or PAT).
For instance, create an allow rule for connecting to pfSense from home on the WAN interface, then limit user connections to only browsing on the LAN interface. Setting up rules for WAN and LAN helps define how external access and internal user connections are handled.
pfSense features a handy mechanism for defining variables through aliases; let’s create one for our home office and tcp ports 80/443 and enable packet logging. Under Firewall’s Aliases menu on the default IP tab, click the +Add button:
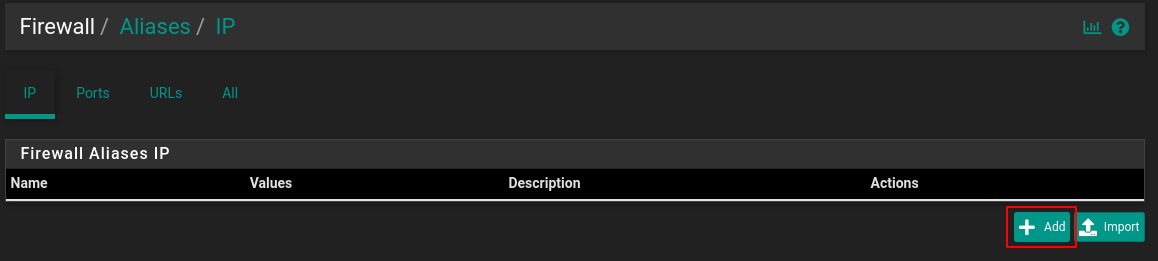
This opens an alias editor for IP addresses:
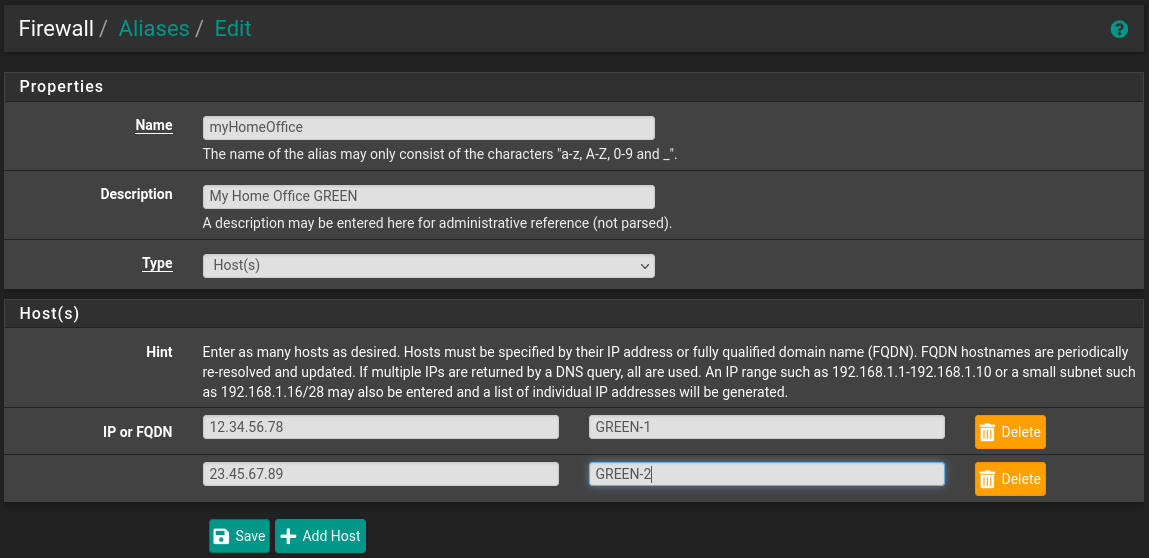
In the editor, assign a name to the alias, select its type (Host(s)), and add IP addresses.
Similarly on the Ports tab, create a service rule.
Provide a descriptive name, add a description, and enter one or more ports:
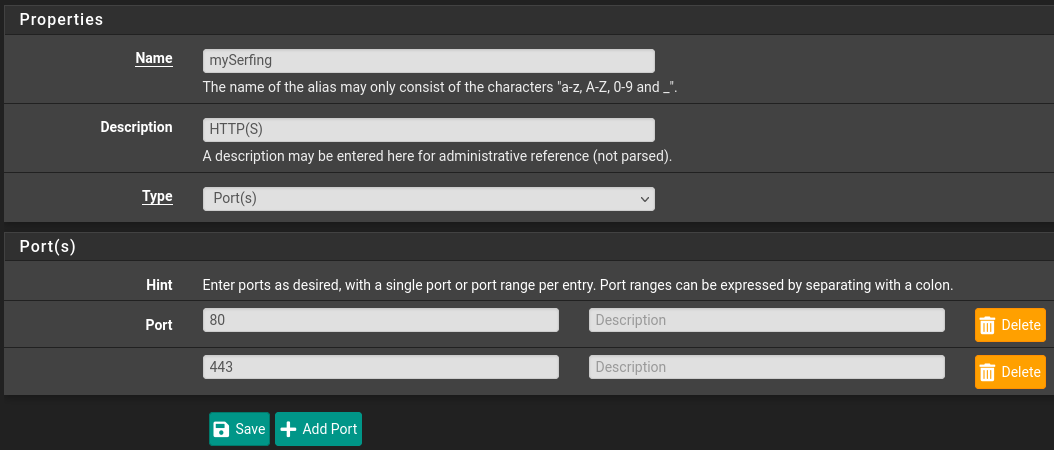
The tooltip provides a convenient method for creating an alias for a range of ports.
To configure this setting, navigate to Firewall/Rules/.
Now when creating or editing rules, we can utilize aliases. This is particularly useful when a setting is reused across multiple rules and occasionally changes.
In such cases, only one alias needs adjusting.
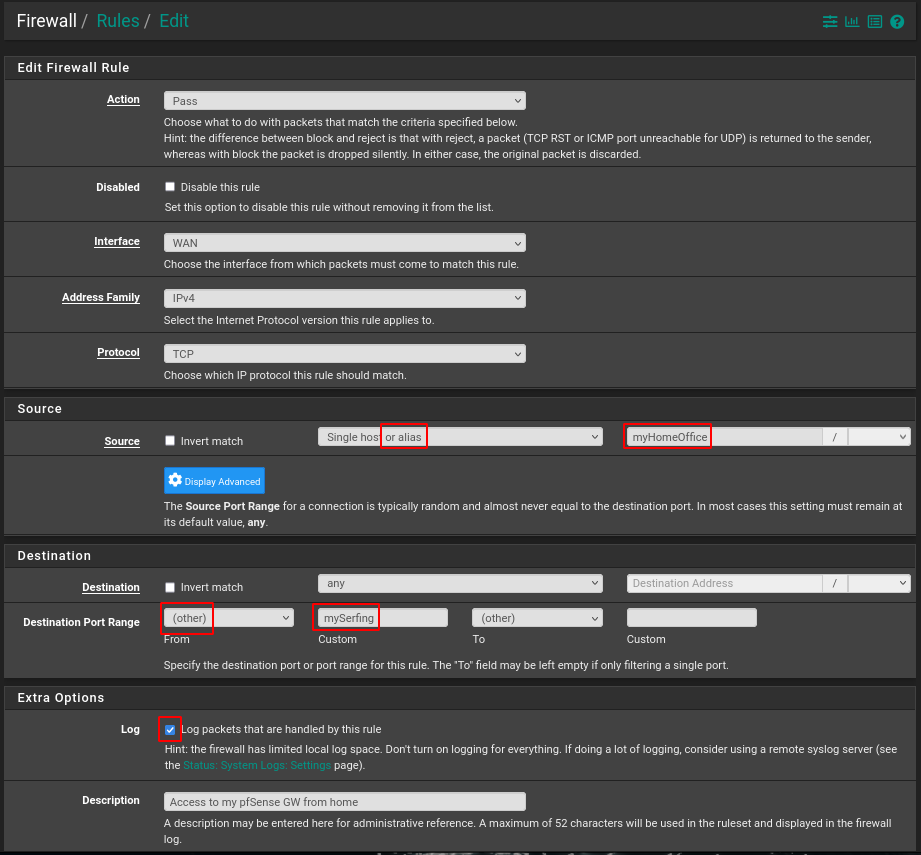
In the earlier example, we selected previously defined aliases for both source address and destination ports.
After making adjustments, remember to click Apply Changes. Now you can test the connection.
Similarly, create a rule for surfing on the LAN interface:
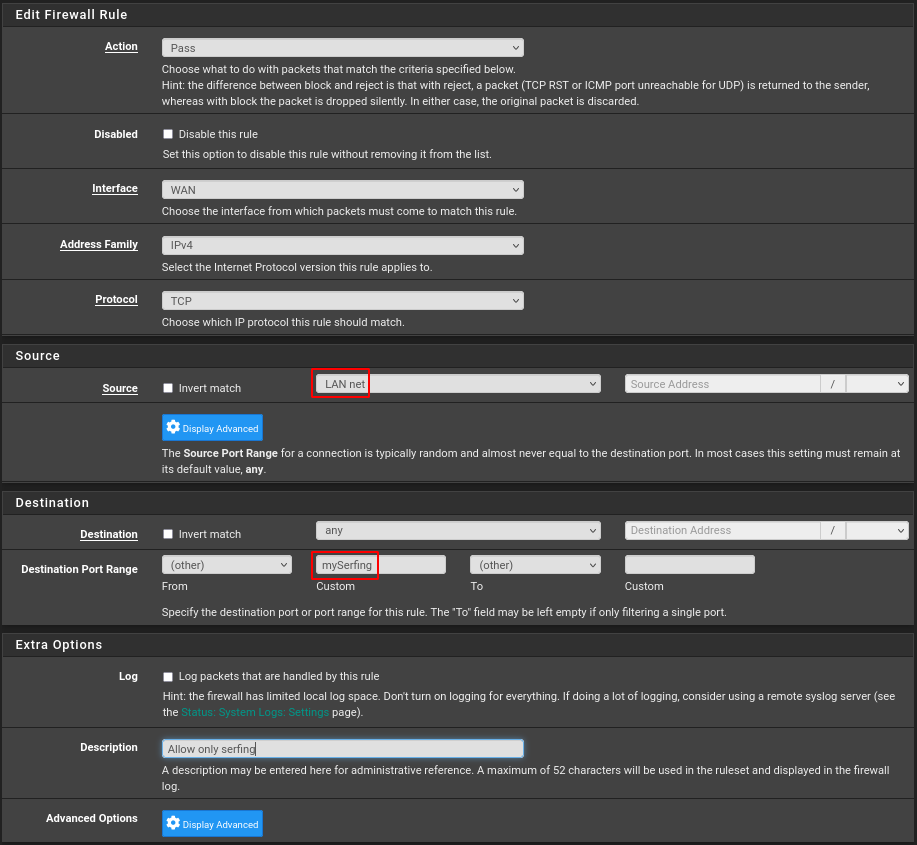
Next on this interface create rules for DNS (udp:53) and optionally for easier diagnostics ICMP (just echo request, echo reply is enough).
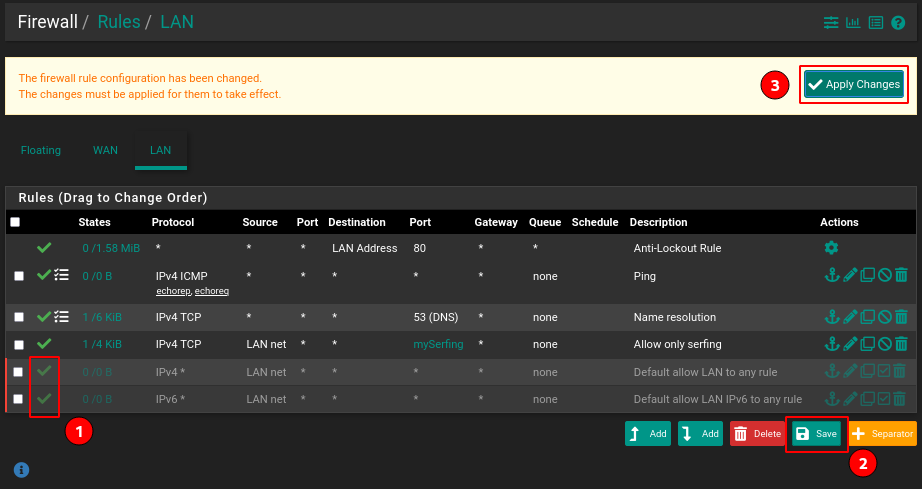
Now disable default rules by clicking on the green checkmark (1), Save (2 if rule order has changed), and Apply Changes(3):
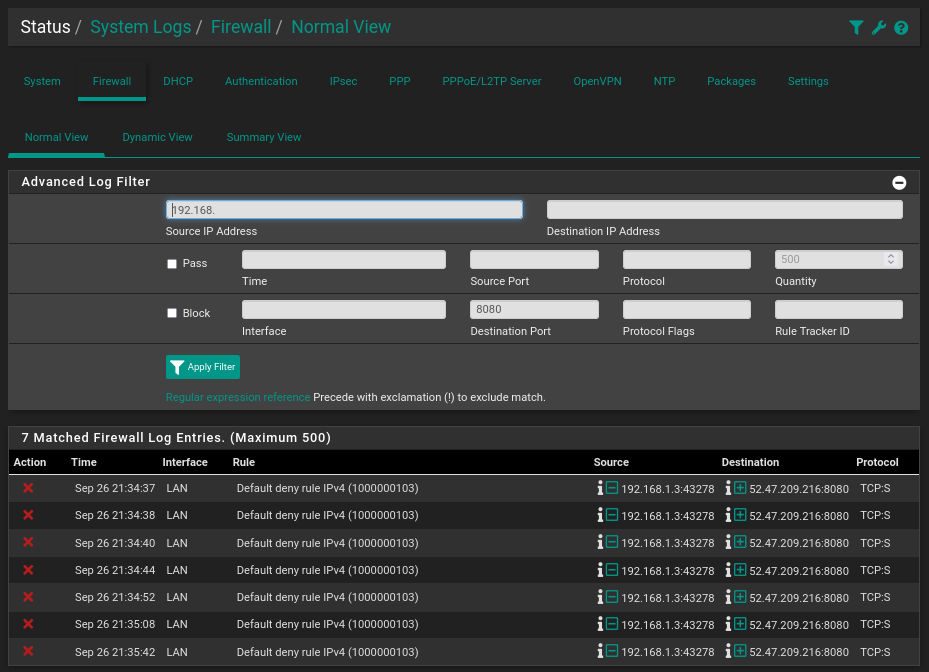
Check access to websites and then to non-standard ports using portquiz.net:
Ping is working, domain names are resolved, HTTP over TCP/80 is open, but the connection fails on the non-standard port TCP/8080.
This is also documented in the log:
Thus, we have accomplished the task of providing access to web resources and blocking unwanted resources on other ports.
Tips for Setting Up pfSense Firewall Rules
Here are some helpful tips for setting up pfSense firewall rules:
- Use Aliases: Create aliases for frequently used IPs and ports to simplify rule management and reduce errors.
- Stateful Firewall Behavior: pfSense is stateful, meaning it automatically allows return traffic for outgoing connections. There’s no need to manually configure rules for related incoming traffic, unlike using `iptables` with `–state ESTABLISHED,RELATED`.
- Configure Rules at the Source Interface: Always set up firewall rules on the interface where the traffic originates to ensure proper handling.
- Manage Default Rules: Delete the default “Allow All” rule on the LAN interface but keep the “Anti-Lockout” rule enabled to avoid losing access to the WebGUI.
- Implicit Deny and Logging: pfSense automatically logs and blocks any traffic that isn’t explicitly allowed, so there’s no need to create additional “log and drop” rules.
- Duplicate Similar Rules Efficiently: Use the “add a new rule based on this one” feature to quickly duplicate rules with minor differences, such as those for different servers or interfaces.
- Use Firewall Logs for Troubleshooting: Check the firewall logs in the WebGUI under Status → System Logs → Firewall to identify and resolve connectivity issues.
Port Forwarding
A frequent task involves publishing a service hosted on a local network, such as a mail or web server.
Test Web Server
While this topic isn’t related to pfSense, our lab currently lacks any resources for publication, so let’s create one.
apt install apache2 php libapache2-mod-php
In the /var/www/html directory, create a file named demo.php with the following contents:
<?php
phpinfo();
?>
With the test server now set up, all that remains is to ensure the web server is operational:
systemctl status apache2
Configuring NAT on pfSense
This is done through the pfSense Firewall menu. Previously, we used the standard HTTP port for remote connections to pfSense, so we’ll demonstrate port forwarding for a different port (TCP:8080) and change its number.
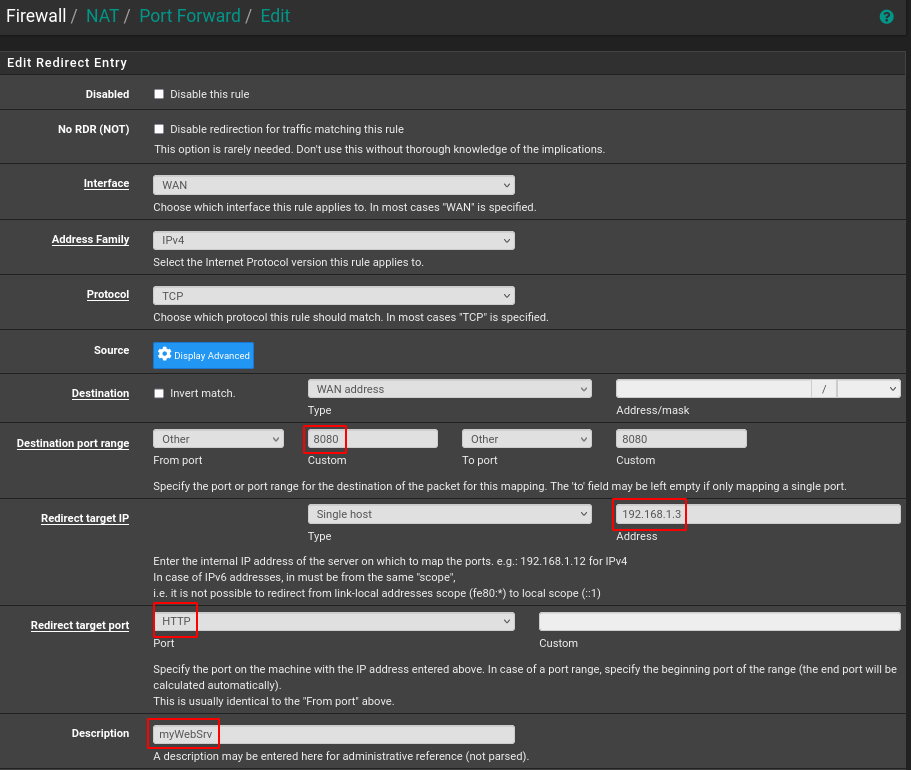
As you can see, setting this up is quite straightforward. pfSense listens on TCP port 8080 and forwards it to TCP:80 of the test host 192.168.1.3, where we previously deployed the web server.
It’s highly recommended to document all rules, as their number may grow over time and become difficult to manage.
Verification
Check our settings by accessing the WAN address of pfSense at port 8080.
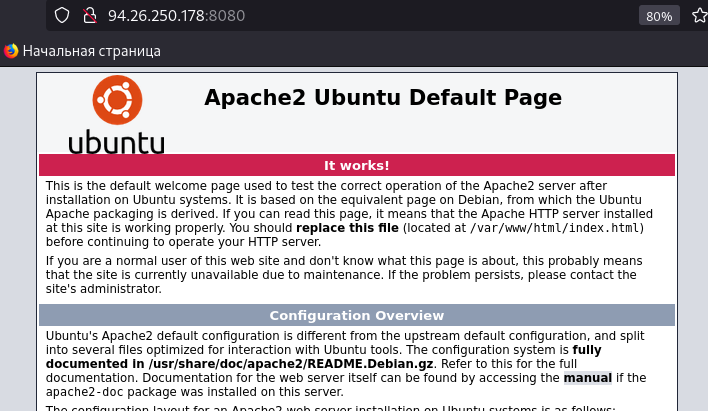
The internal web server has responded at the public address. Adding the title of the demo page, we see that it has also been successfully published.
The CE Repositories
The CE Repositories setting determines whether to include Community Edition (CE) repositories among the available versions. This enables users with devices compatible with pfSense Plus to install the CE version if preferred.
The Swap Size
The Swap Size configuration specifies the size of the swap partition to be created on the target disk. Swap space supports crash dump data and acts as virtual memory to supplement RAM. Enter a size value with a suffix (e.g., `1G` for 1 GiB) or set it to `0` to disable swap entirely. While swap usage increases disk writes, maintaining a small partition for crash dumps is generally recommended.
Console Serial and Type
The Console Serial option toggles the serial console on or off for the installation, while the Console Type determines the type of console used. Options include:
- EFI: Ideal for systems booting with EFI, supporting video or serial output.
- Video: The traditional VGA-style console.
- None: No specific console type is set.
Once these settings are configured, selecting Continue and confirming with OK will return the installer to the Welcome Menu, ready for the next step in the setup process.
Updating
pfSense is a multifunctional and user-friendly tool. Updates are easily performed either in the System Information section on the dashboard or through the System -> Update menu.
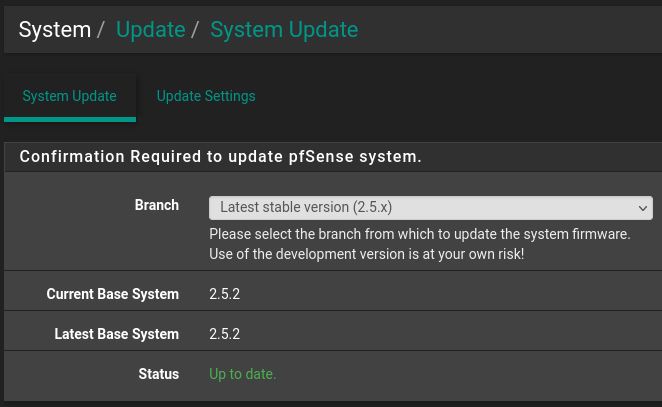
Our system was installed from the latest distribution and is already up to date; no updates are necessary. Updates are typically released every six months.
If you’re ready to experiment, you can update to the experimental branch.
Here’s what updating from the previous version looks like (2.4.5):
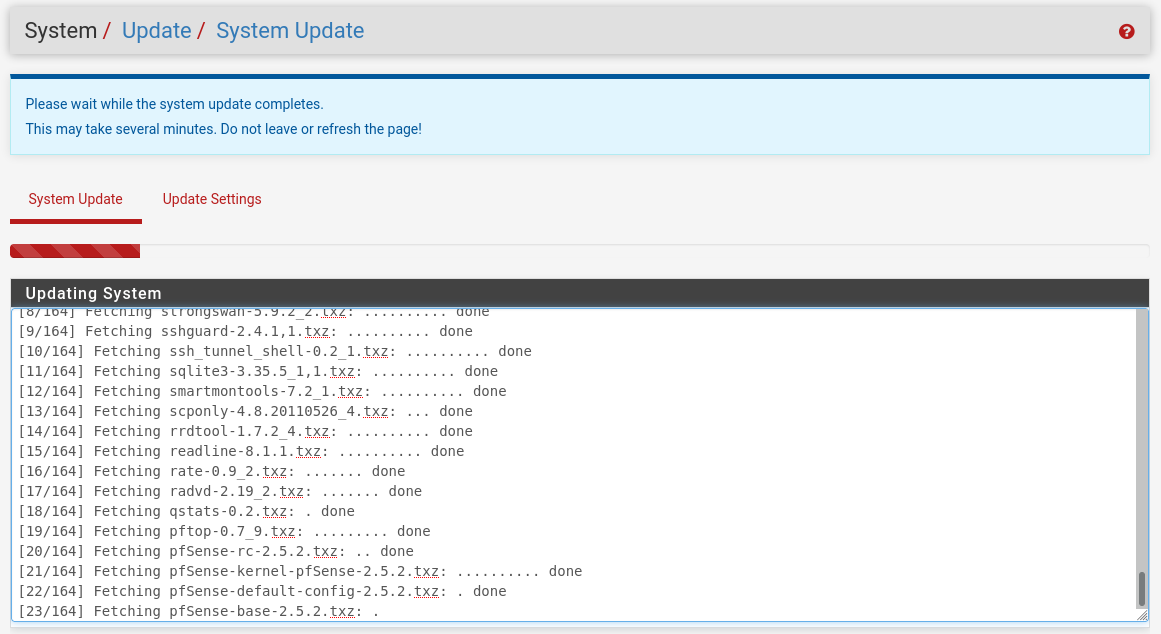
Once the process is complete, the system will automatically reboot:
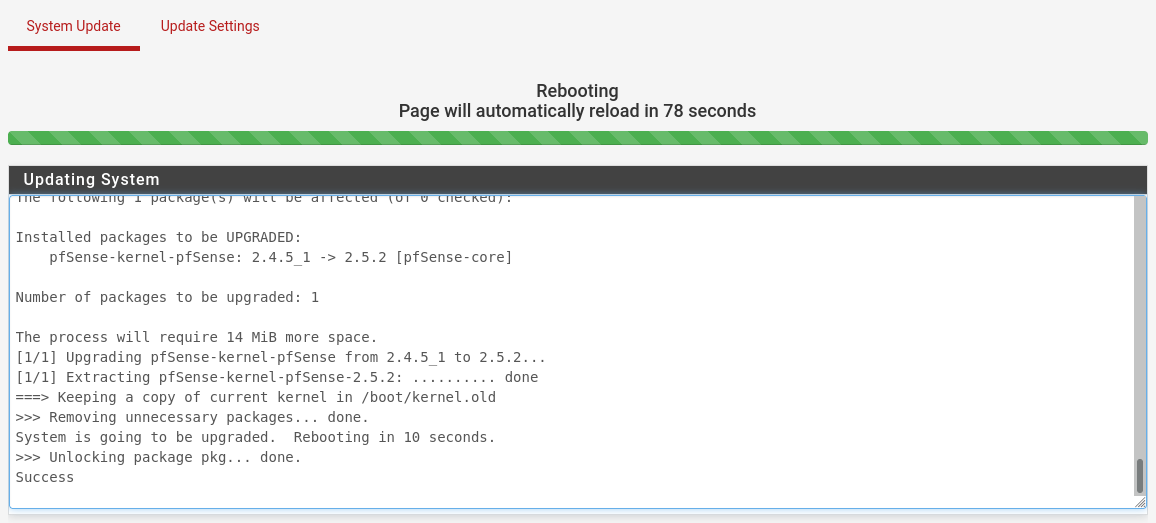
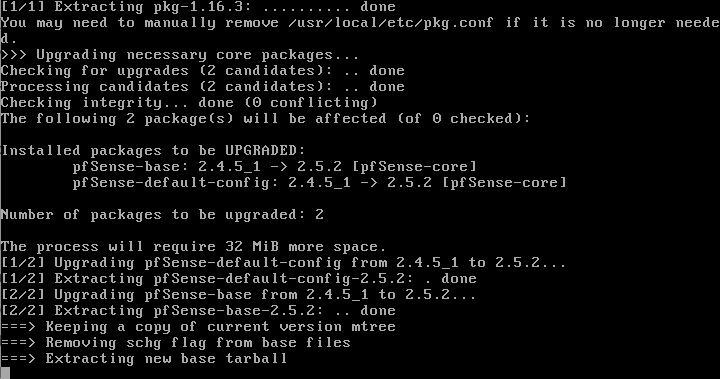
Following the reboot, the console displays the unpacking and installation of updated packages:
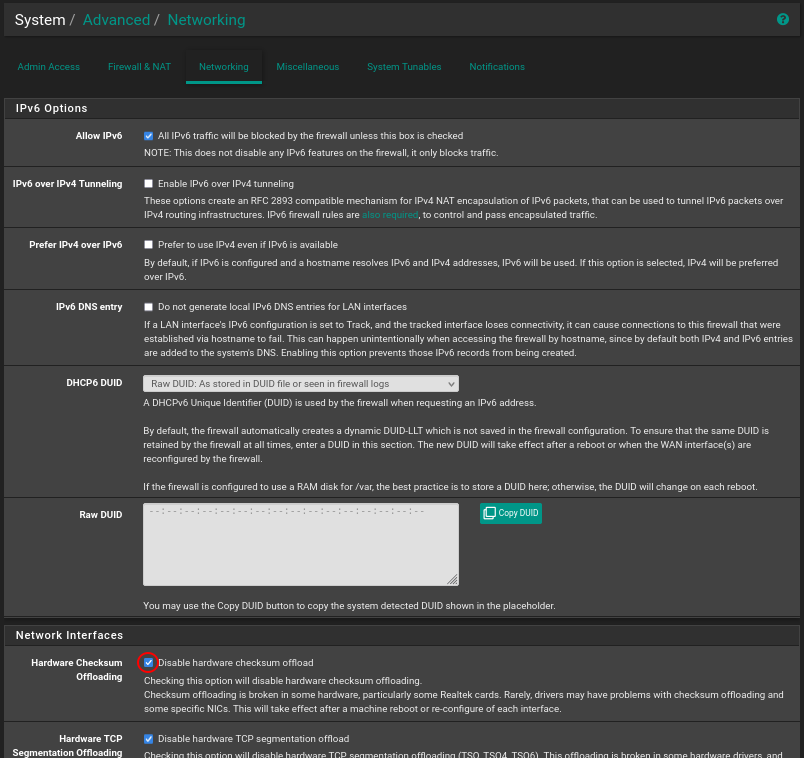
It’s also advised to disable Hardware Checksum Offloading for Realtek adapters.
Internal Routing
If the internal network is segmented, pfSense should be configured to use the appropriate routes. Static routing is available right out of the box, configurable via the System -> Routing menu.
First, create an internal gateway(s), such as myIntGW, under System -> Routing -> Gateways tab, then add the route under System -> Routing -> Static Routes tab:
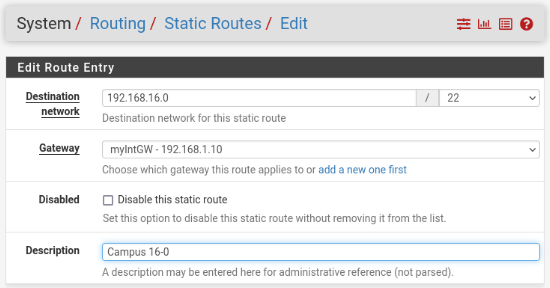
After configuring the settings, remember to click the “Apply changes” button.
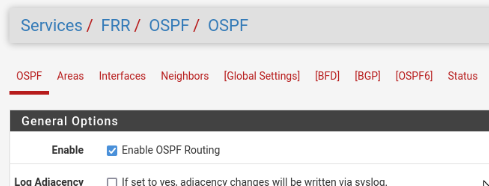
Dynamic routing scenarios require installing an additional package like frr (Free Range Routing), which supports numerous protocols including GP, OSPF, RIP, IS-IS, PIM, LDP, BFD, Babel, PBR, OpenFabric and VRRP.
After the package is installed, protocol configuration sections such as FRR-OSPF are added to the Services menu:
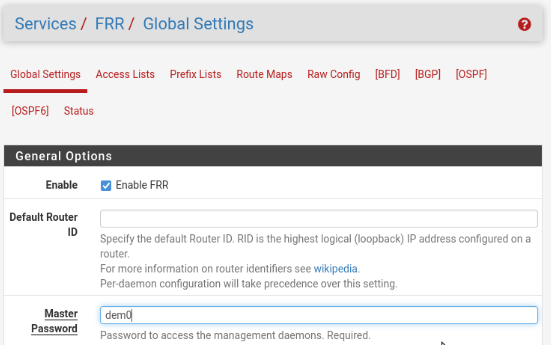
Before setting up dynamic routing in Global Settings, activate FRR and set up the mandatory master password:
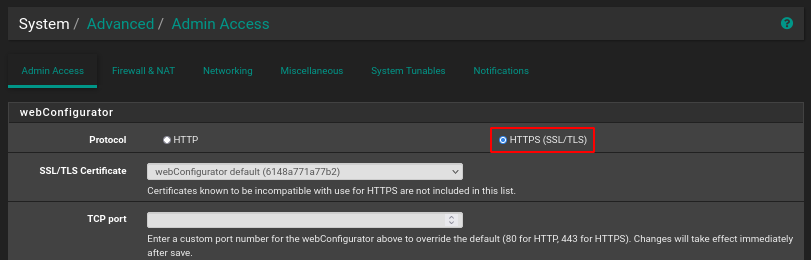
SSL
The management interface can be swtiched between HTTP and HTTPS via the Advanced section of the System menu.
Upon installation, a self-signed certificate valid for 13 months is generated.
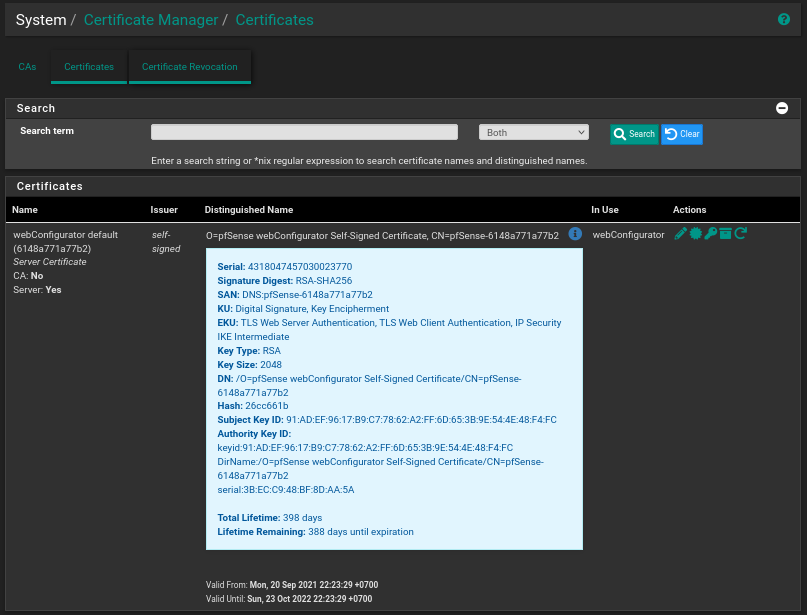
From the same menu, clicking the Add/Sign button allows you to submit a request to a corporate certification center and then install the received certificate or reissue the self-signed certificate for a different term.
Typically, the pfSense interface is only accessible from within the internal network and does not allow direct external access. If you need it accessible from the outside, disable the Anti-Lockout Rule found in System/Advanced/Admin Access/webConfigurator for the LAN interface.
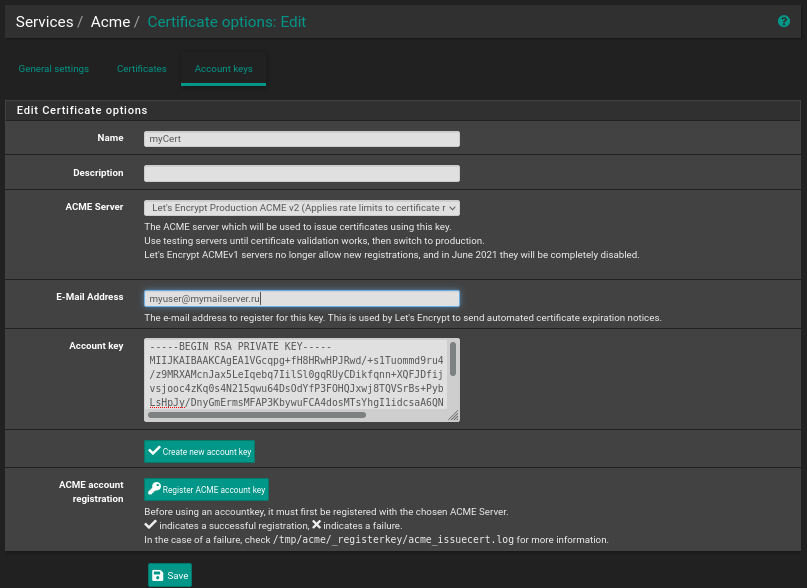
Access from the WAN requires a previously created rule on the WAN interface. Using a certificate issued by a publicly trusted certification authority like Let’s Encrypt is also convenient. Given that such a certificate only lasts 90 days, frequent renewal is necessary.
The acme package in this repository helps automate certificate renewal:
Bandwidth Restriction
In some organizations, certain users must be allowed unlimited internet access. This can lead to congestion of the entire channel and disrupt other users and services. Bandwidth limitation can help address this issue. The Shaper offers numerous settings; let’s explore one of its common usage scenarios.
It’s located under Firewall > Traffic Shaper in the Limiters tab.
Let’s measure the current speed.

As mentioned earlier, navigate to Traffic Shapers under the Firewall menu, select the Limiters tab, and create 2 limiters.

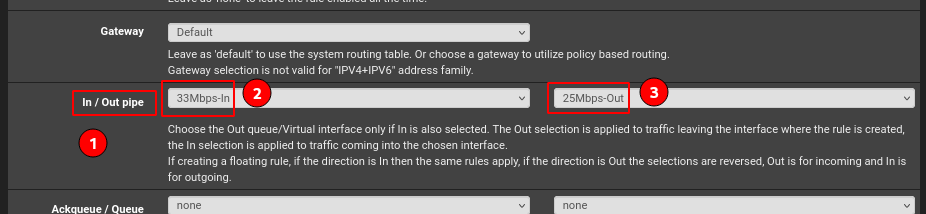
Activate the rule (1), assign an easy-to-understand name (2), and set the bandwidth (3). Separate rules are established for download and upload limits (4).
The shaper is directly activated within the firewall rules (Firewall → Rules). We want to restrict outbound traffic from our internal clients, so let’s modify/add rules for the LAN interface accordingly. Limits names are taken from the perspective of the interface side: In – incoming traffic, Out – outgoing traffic. To restrict outbound client traffic, use the In rule.
Open the Rules section under the Firewall menu, navigate to the LAN tab and, in the Extra Options section of the required (newly created or existing) rule, enable advanced settings display (Display Advanced button):
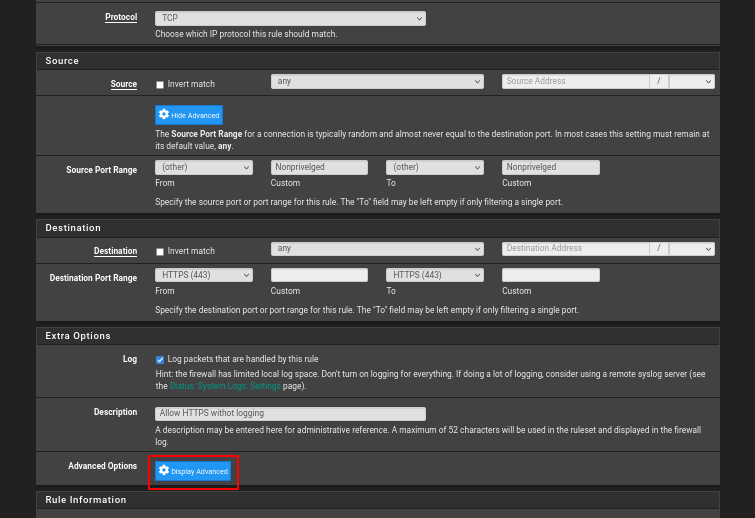
Note: The example shown above uses an existing rule that permits internal clients to connect via HTTPS.
In the second-from-last section of Advanced Settings (1, In/Out pipe), specify the rules for traffic incoming to the interface (2) and outgoing from it (3).
After saving and applying settings, pfSense notifies of the need to reload filtering rules in the background and suggests checking the status on the Status/Filter Reload page.
Following rule updates, let’s take another speed test.

Additional Features
pfSense’s functionality is expanded by numerous packages available through its package manager; here are just a few:
- apcupsd – a daemon for interfacing with APC UPSes (now Schneider);
- arpwatch – monitors MAC/IP address activity;
- cron – a scheduling tool;
- filer – a file manager;
- squid/lightsquid/squidGuard – proxy, report generator, and filter.
- lldpd – supports discovery via Link Layer Discovery Protocol and also supports proprietary protocols such as CDP, EDP, FDP, NDP.
- mailreport – sends reports via email.
- net-snmp – SNMP graphical interface.
- nmap – the classic tool for network scanning.
- snort/suricata/zeek – solutions for IDS/IPS systems.
It’s important to understand that using these features requires better hardware. Heavy VPN use may necessitate one or more additional CPU cores, while IDS/IPS systems will also need an extra 1-2 GB of RAM.
Let’s demonstrate enhanced functionality using the popular nmap scanner. In the System menu, navigate to Package Manager, select the Available Packages tab, click Install next to the NMap package, wait, and access the built-in scanner:
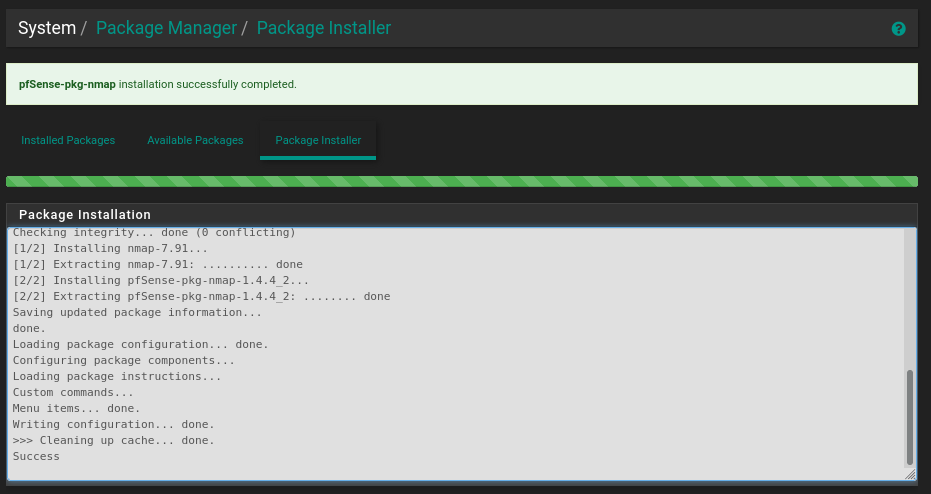
NMap is now available in the Diagnostics menu; launch it:

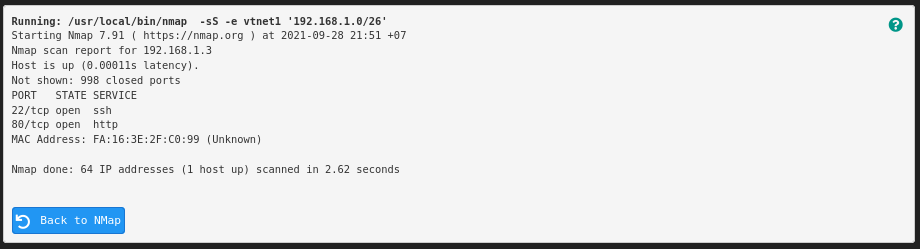
Our lab’s internal segment contains only one host, which was successfully detected and scanned:
Conclusion
This article presents an overview of pfSense, a solution for implementing a high-performance, reliable, and functional software router. We learned how to install, configure, throttle speed, and enhance functionality by installing extension packages.